Sunday, October 30, 2011

Almost Still Life

Almost Still Life
I'm fighting some nasty cough and decided it was best to stay home this morning and drink hot tea.   That gave me a chance to sew on the binding for my little art quilt entitled, "Almost Still Life."

I purchased a used book, Art Quilt Workbook by Jane Davila & Elin Waterston.  When those used books are labelled as "good" condition, that may indicate that the previous owner scribbled in it.  Thankfully, that person only made it halfway through chapter two.  The rest of the book is clean.


binding detail
 I chose a decorative stitch that sort of looks like lizard footprints.  I like the footprints suggestion of motion in an otherwise still scene.


Detail of the bumpy gourd

It took several colors of thread, some solids, some variegated, to suggest the bumpy texture and mottled colors in this gourd.  I think I could have added three times as much thread, but decided not to flatten out the quilt here.


My current flavor of hot tea is Vanilla Madagascar.  No honey, just hot tea.  It soothes a sore throat just by being hot.

Enjoy your day!
- SeeingStars

Friday, October 28, 2011

Merry Grinchmas!

Merry
Grinchmas (sort of hard to see, but I promise it's there)
Here's an adorable customer quilt!  Her first top and it was made in a beginner's class.  It was fun to quilt because it's so playful and whimsical.  I can imagine her 2 little boys snuggled under the quilt, waiting for a story, and picking out their favorite scenes from this fabric.  I added more elements in the quilting to continue the fun.


The quilting is subtle, since it's white threads against a lot of white and yellow background.  It made photography a challenge!  But I'll show you what I can.
Ribbon, gifts and Seussian style bubbles in the pink border all the way around the quilt.

Of course, the Grinch!

... and Max

an empty stocking

a wonky tree
The quilt back is even, I just didn't get it straight on the bed.

I think she did a great job as a first time quilter.  It was so fun to see her enthusiasm as she dashed through the quilt shop, picking fabrics out for her next 2 quilts.  She's thinking about more ways to bless her family with a gift made by her hands after the next two are completed.  We've hooked another one!  I remember being warned about this very thing in my beginner class. 

Enjoy your day!
- SeeingStars

Friday, October 21, 2011

WIP Cutting Table

Cutting Table for a 5' 6" quilter
It's almost finished!  My box is firmly attached to the dresser and is just the right size to support the cutting mat of 25" x 37".  The grid is 24 x 36, but there are margins around the edges.  I'm planning to use the top drawer for longarm thread storage and perhaps other longarm supplies.  No plans yet for the open cubby or the lower drawers, but I'm sure they'll get filled.

The 3 pumpkins still need borders and stems before being quilted.  I'll share more about that project soon.

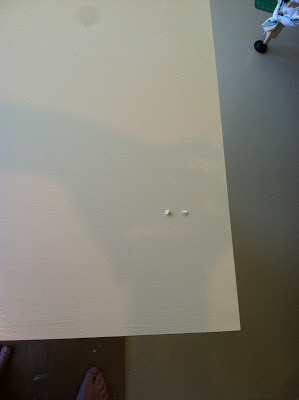
More confessions ... I drilled pilot holes too deep and they poked through the top surface!  Of all the places to make this mistake, I was not pleased to see that I ruined the top.
Mistake.  Bummer.
So I've scraped and filled the holes with wood filler.  Tomorrow morning, I'll sand and clean and repaint the surface.  I've done the same with 4 screws holding the box to the dresser top.  I had hoped to screw in from the drawer side upward, but couldn't get the drill to fix in that space.  So I had to drill from the box bottom thru to the dresser surface and countersink the screws.  Those holes are also scraped and filled.  They'll also get another coat of paint tomorrow.

It will be ready to move into place and I'll take photos of the whole studio.

My next home project challenges are for the birds, literally.  Sadly, several birds have hit the windows and perished.  I've read that moving feeders closer to the windows can disrupt their flight patterns and help them to stop flying into the windows.  We currently don't have any feeders after the storm damage, so I made a few temporary ones after I just returned home from Lowes.  Eye roll.  I could have picked up a few while I was there if I'd realized our old ones were gone.   These are hanging near the studio and hopefully will help prevent injuries and worse.

The second bird project involves discouraging the woodpecker from drilling through our front porch.  I did remember to purchase an owl decoy and set him up in view of the holey porch.  Since the wood filler was already in use in the studio, I've at least started patching the porch damage.  One of the holes is really deep and will probably take a few iterations of filler before I can paint it.  What a naughty woodpecker!  There are plenty of trees he can use instead of our house.

The band is marching tonight, so I'm off to find warm clothes before arriving to chaperone Bus #3.  : )

Enjoy your day!
- SeeingStars

Thursday, October 20, 2011

Pressing Surface

I still have a decision to make about this addition to my studio and I'll enjoy all your comments full of advice to help me.   With leftover wood, I fashioned a pressing surface that spans 5 feet by 2 feet.  (That's 60 inches by 24 inches for you quilters who don't think in terms of feet.)
New Canvas Pressing Surface
This project was actually finished before the ruler apron, but I haven't shared it yet.  I can prop it against the wall when I'm not using it and since the 24 inches is much shorter than the table, it doesn't obstruct the view.

I started with Sharon Schamber's video for a pressing surface.  Then added some cotton batting and 2 yards of canvas from Wally World.  The leftovers were perfect for the apron showcased in yesterday's blog.

So my question is simple : Should I set this up to use on my ironing board or over my WIP Custom Cutting Table (aka green dresser which is still being painted)?  The ironing board has an adjustable height and the WIP Custom Cutting Table will be a perfect 40 inch height for my 5' 6" frame in Converse tennis shoes or barefoot.  I love to sew barefoot, even at Kat's studio, which is very dangerous due to all the pins embedded in the carpet.  I'll regret it one day, but until then, I'll wiggle my tootsies as I sew.  I drive barefoot too.  Shhh!  Don't tell.

Once the decision is made, I'll add some wood to the under side to hug the profile of either the ironing board or Custom Cutting Table, so it won't slip around as I use it.  I imagine customer quilts receiving a nice press before loading to my frame.  I can also imagine using the pressing surface for my own fabrics and quilt tops.

I know you've noticed all the canvas and neutral colors so far.  My goal is to make the tools blend in to the background so the current project really takes center stage.  I think with all the cream colored furniture, this will happen easily.  I've planned curtains to offer some shade in the sun room once Mr. Seeing Stars is either agreeable or not strongly opposing this step.  That will prevent the sunshine from fading whatever fabrics are currently occupying the studio.  These curtains will be mostly canvas with about a 12 to 18 inch blue/yellow/cream stripe at the top.  Canvas drop cloths at Home Depot come in a 6 foot by 9 foot size with the edges already nicely seamed for $10.  The stripe is available now from HobbyLobby.  I just happen to have a birthday gift card from that very place to help with the cost.  Now I just need to find a bargain on curtain rods!

Enjoy your day!


This is the day that the LORD has made.  Let us rejoice and be glad.  - Psalm 118:24


- SeeingStars

Wednesday, October 19, 2011

Ruler Apron

Do you remember reading Katy No Pocket by H. A. Ray as a child?  It's a story about a kangaroo with no pockets.  After much strife over her lack of ability to carry children, she meets a carpenter who gives her an apron full of pockets.
Here she is at the end of the story.  She's happy because now she's able to carry around lots of little friends.

I've thought of Katy all day today as I made a new tool for my sun room.   I'm really excited because it turned out just as I hoped.  I like that I can keep all these things near me, but not cluttering the table top as I work.
It's made from some leftover canvas and attaches to my folding table with 4 velcro tabs.  I use several rulers and there's a place for all of them. 
On the left at the bottom, there are two 6 x 24 rulers and above is a pouch for squares in 6 and 6.5.  Then, the right side has a 12.5 square at the bottom, with a 9.5 above.  Finally, there are two smaller pouches : one for the missing 4.5 square ruler and a larger rotary cutter, and last tiny pocket holds a small pair of scissors and a small rotary cutter.  I also tossed in two Add-a-Seam rulers for paper piecing, since they fit too.

If you try something like this, I'd suggest first pinning the pockets in place to make sure there's room to lift each ruler out.   I decided to make the upper row of pockets 3.5 inches from the top edge, since the apron is slightly under the table top.  This allows easier access to those top pockets.  Also, I cut each pocket 2.5 inches wider than the ruler.  Then, as I turned in the raw edges, I still had plenty of width so the ruler isn't too tight.

Here's my test case with all the pockets pinned.  Even though I didn't need to move anything, I'm really glad to test it out first.
To celebrate my successful project, I began a pumpkin table runner today.  It will be a festive touch for our Thanksgiving celebration and a nice gift for my sister-in-law, who makes it look easy to feed so many guests from her kitchen.  You wouldn't believe how many people end up crammed in her small kitchen as she cooks.  She just smiles and reaches around us rather than fussing at us to get out of her way.  We should all be as gracious as Patti!

It's been threatening to rain today and it's been much colder too.  I've enjoyed watching the leaves blow as I've worked.  No painting for today either.  Yesterday was a crazy time of dragging pieces in and out as the weather changed.  So I'll return to my cutting table when we have sunnier weather.  I'm looking forward to getting that project finished, so my little space will be even more useful.  One step at a time!

I meant to show you my bobbin case on the sewing desk yesterday.  Here it is lifted up from the table surface.  As I confessed, I just didn't see the need to paint all those extra little shelves since I don't use this piece.  It won't lift up with one hand and even with two, it becomes a wrestling match to get it out of its resting place.  Great idea, but not so useful in practice.

Enjoy your day!
- SeeingStars

Tuesday, October 18, 2011

Confessions of a furniture painter

 Here's my "new" sewing desk!  I really like how it turned out with its new coat of paint.  I know I promised a photo from the back of a galloping horse, but I just couldn't fit the horse inside the studio.  So instead, you'll see all the flaws.

If I was about to start this project all over again with my newly found wisdom, I'd remove all the hinges.  The rubber cement did work as a paint resist, but I still had to deal with paint drips in the cracks of those hinged surfaces.  It would have looked a little better if they were painted as separate pieces.  Plus, there would have been less resanding and repainting to fix flaws.

The other thing I'd like to think I'd do differently would be to do all the painting in a nice clean, well organized and spacious garage.  However, this might prevent the project from even getting started.  There would be many fewer dead bugs in my zipcode if I'd painted under the garage roof and I wouldn't have had to drag all the pieces inside each night to avoid the dew.

Notice the cutout for the sewing machine?  The back side has a funny profile now.  That's because I used a jigsaw for the first time and cut an L shaped piece to allow my machine to fit.  My Bernina has a larger footprint than the sewing machines made a few decades ago when this desk was crafted.  Before, I had to keep the back piece tilted up from its hinges.  This made machine quilting or sewing on a binding a little harder because of the vertical wall when that piece was tilted upright.  Mr. SeeingStars was very supportive and stayed right there as I made the jigsaw cut.  Then, I asked him to show me how the router is used to smooth those edges.  He chose a bit that complimented the previous edge and worked his magic to make the finished edge look great.  I'm so glad to have his help.  I just wasn't ready to try my luck with a router.  I've heard before that it takes practice and I should use it on lots of scrap pieces before trying it on real furniture.  Thank you, Mr. SeeingStars!  You're my hero!


This is how I used to sew with the back section raised.  I covered a rectangle of foam insulation to raise the sewing machine height to be level with the top of the desk.  The foam is covered with a piece of canvas.  I considered adding this second piece to it, but it's not necessary.  The only part that shows is the part closest to the front.

There's a bobbin storage compartment that came with this desk.  I'm not comfortable using it because it sticks before adding paint and I fear the bobbins would fall to the bottom.  Since it's not convenient, I decided not to paint the whole thing, just the top inch or so.  A perfectionist I am not.  So sense I'm bearing all my mistakes, I'll share the bobbin storage part too.

Overall, I'm thrilled with the result.  The process of painting isn't really that much fun, but it's worth it to keep the goal in mind.  Some furniture that's functional and looks good in its setting.  I hope I'll soon get to the point of forgetting this project and just using the desk to sew and quilt.

Would I do it again?  You betcha!

The next project is a custom cutting surface made from an old dresser, a sheet of MDF and some more paint.  More to come in later posts.  Am I nuts to start another project so soon?  You betcha!  But the sooner I start, the sooner I'll be finished.  I can't wait to keep all my longarm threads in the top drawer!

Is she really doing this again?

Enjoy your day!
- SeeingStars

Saturday, October 8, 2011

Sewing Table WIP Part Three

Lessons Learned regarding painting furniture:
1b.  Bugs do not own watches.  They're just as prevalent in the mid-day and evening as they were yesterday in the morning.

2.  Do not paint the area above your foot room first, then crawl inside the foot room area to paint.  Your hair will end up funny colors and the patterns left in the paint are quite noticeable and unique so that it cannot be blamed on bug wings and bodies.

3.  Latex, water washable paint sticks very well to paint brushes.  It forms a bond that cannot be separated by mere soap and water.  The best bet is to throw away the paint brush and purchase a new one.

Since I'm up to about 176 thin coats of paint, I guess I've spent somewhere around $800 in brushes.  OK, Not really!  I wash them out the best I can and re-use.  Since I've sanded off more paint and bug wings than I have left on the furniture, I'm calculating the resulting number of paint layers at or near - 25.  At this rate, the desk will be completely sanded away to nothing but saw dust in about 4 more weeks.

If however, this project is ever considered complete and there's enough matter left in the desk to have it show up in photography, I'll jump on the back of a galloping horse and snap a picture my updated sewing desk as I pass by.  I'm sure you'll agree that it's a most professional updating job.  (Wink!)  Just in case, I won't quit my day job.

Enjoy your day!
- SeeingStars
Friday, October 7, 2011

Sewing Table WIP Part Two

Since I did mention that we can all learn from my mistakes, I'll share the first today :

1.  Don't start painting early in the morning with cardboard protecting the grass.  All those little bugs are happily jumping around in the morning dew and sunshine.  Their little wings stick to the furniture you're attempting to paint using careful, even strokes.

There will be no photo of this mistake as all those bugs wings were promptly sanded off the first coat of paint.

Enjoy your day!
- SeeingStars

Thursday, October 6, 2011

Sewing Table (WIP)

For my non-quilter friends, a WIP is a Work In Progress.   Since I haven't returned to sewing yet, I'll share my first steps of painting the sewing table.  It was easy to remove the drawer pulls and drag it outside.   Here's after I stopped sanding the first time, but later realized I had a lot more to go before it was truly sanded.

I used rubber cement to cover the hinges.  I know it's weird.  I've not tried this before, but I'm hoping it will act as a resist to the painting and will rub off afterwards.  OK.  I did actually try this method yesterday on a piece of scrap wood.  It worked well in the areas with a generous amount of rubber cement.  Those areas where the rubber cement was thin just absorbed into the wood and accepted the paint as if there were no barrier.

Just in case, I also used some painter's tape.

I realize that it might have been better to remove the hinges before painting, but I know these hinges support weight and I'm concerned about getting them back in place just right.  I opted for the (hopefully) easier way. 


Finally, I've sprayed a few layers of white primer on everything.  Tomorrow, I'll brush on the paint in very thin layers and hope that it looks as great as those fearless I-found-this-beat-up-piece-of-furniture-on-free-cycle-and-turned-it-into-an-heirloom bloggers show off.


If the result is disappointing, then we'll all learn from my mistakes (of which I seem to be excelling in making these days).

Enjoy your Fall day!
- SeeingStars

Saturday, October 1, 2011

Moving In

Sunroom's basic arrangement
We moved in mid-September!  It's so great to be back home.  My neighbor, Wendy, came by right away to help me get started unpacking.  Next, my dad and Donna came for several days with their sleeves rolled up to help us tackle stacks of boxes.  It was such a help to get the kitchen unpacked.  The living room came next and we could even enjoy a place to sit.  Then, we tackled the laundry room / mud room with its giant storage spaces to help us tuck away items that need to be close by, but not in view all the time.  Dad brought countless boxes upstairs to clear the basic living areas.  I'm sure his decision to live in a single story house was reconfirmed!  What a workout!  Last week, Sharon dropped by and helped me get the linen closet filled and more boxes out of the house. 

It's so nice to have the extra encouragement, along with conversation and terrific ideas as we work.  As an added benefit, it also helps me donate more items.  When someone asks me where to put something that we don't really use anymore, I can take a fresh look at it and realize that it doesn't fit our lives.  If I'd worked alone, I might tuck it away somewhere and move on without thinking much about it.

There's still more to do, but we can slow down a little and live here as we unpack more each day.  In fact, we've definitely been doing the living part here.  Our guest room was empty the first night we were here.  It was empty again last night too.  But the ten days in between were filled with family and a couple of teenagers.  I've loved having a few extra people here.  The house seems to be glad too.  We've not felt cramped at all and it's been nice to have the extra laughter.

The quilting studio is semi-set up now, but missing a vital element.  You'll notice the longarm frame is assembled.  The t-shirt quilt is still on a roller.  It's awaiting me to try adding the binding while on the frame, which is a new trick for me.  I've draped some canvas over the quilt to keep the sunshine from fading it until I'm ready to start sewing again. 

The big table on risers is temporary, just to see if it would fit.  I'd like to have a large area for pressing and perhaps cutting also when I need to use the larger mat.  My first phase will be to make an ironing board top (which rests over the current cover) using wood and batting to increase the surface size.  The larger cutting area isn't used often and I can tiptoe into the dining room and use that table occasionally when squaring up quilts, etc.


My sewing table is in the corner, right next to a little extra space for cutting.  You might have noticed that there's no sewing machine yet.  I've waited for two reasons.  I didn't want to get too distracted from unpacking and getting settled.  Also, I'm thinking that my little thrift store purchase might look a lot better if I sand and paint it a cream or white color.  That brown just doesn't go well.

Once the machine is on the brown table, I'll mentally add the painting to my to-do list, but it probably will remain there for ten years.  So I feel it's something I need to go ahead and handle first.  Don't you hate those roadblocks, where you sense a project is just too big and you don't want to get started?  How silly I must look from God's point of view when I think this project is overwhelming!  Many of you would counsel me to "eat this elephant one bite at a time" by removing the drawer pulls first.  Then drag it outside and begin sanding it.  I hope to share photos of this process soon ...

We still have a few loose ends to handle with the rental house, the builder, utilities, etc.  So for now, these take priority.  I'll enjoy the journey along the way and look forward to sewing again when I can.


Enjoy your day!

- SeeingStars